
Part One of the Carousel Crochet-Along, designed by Sue Pinner and hosted by Stylecraft Yarns has just been posted, and is available to download NOW from the Stylecraft website, in English (US and UK), German and Dutch.

If you haven't set up a Ravelry project yet, the pattern page can be found here: http://www.ravelry.com/patterns/library/carousel-cal
We are working the CAL along with you all (Anne in the new Batik yarn, and Michelle in Special DK, and will post our tips and tricks for each part at the same time as the pattern is published over at the Stylecraft website.
Please feel free to ask any questions in the comments or on our Facebook page (https://www.facebook.com/crochetbetweenworlds/) - we are here to help you. Anne is doing the German translations for the CAL again, so ask away in German too!
Part One, the Centre Motif:
 |
| Batik (Anne) |
 |
| Special DK (Michelle) |
1. At the beginning, do your 10 finger wraps around your pinky finger! This will keep the hole in the middle not too big. It might take a little bit of practice!

It's also quite difficult to shuffle your stitches around this chunky magic circle, so try and crochet the 16 stitches evenly around your circle. The effect is great though!
2. Try using standing stitches! They look much nicer than starting each round with chain stitches, and are easier to join into at the end of the round :)
Standing sc (US) or dc (UK) tutorial by Mrs Micawber

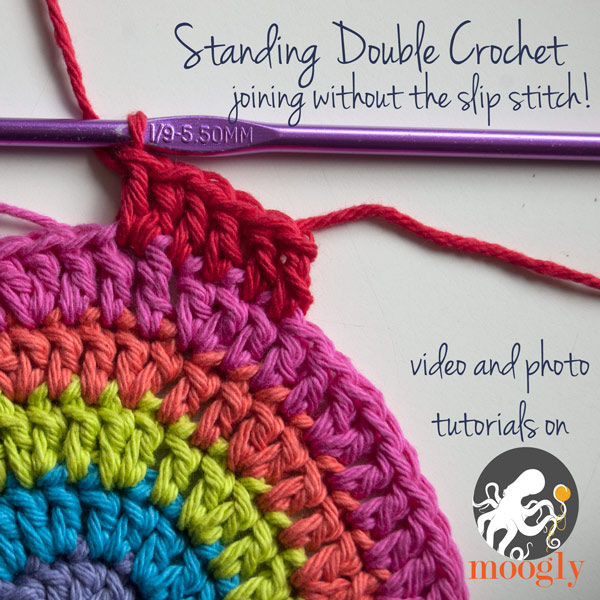
Standing dc (US) or tr (UK) tutorial by Moogly
Stacked Standing DC (US) / tr (UK)
(this one is for when you're continuing with the same colour in the next Round - the others only work with new yarn)
sc into target stitch. Insert hook under two leftmost strands of sc, yarn over hook to do a second sc.

3. The neatest way I could find to close the Popcorns in Round 3 was to do the slip stitch into this loop of the first dc (picture is facing the back of the round):


This is what worked for me - you might have done it a different way :) There's no rules as long as it comes out looking nice!
4. Row 3 will look a bit wibbly when you finish it, and that's ok. The waviness will sort itself out in the next few rounds!

5. If you're using standing stitches, you'll need to get your yarn across to the next ch5 space in Round 7. After finishing Round 6, I did (ch1, slst in next sp, ch1) and then proceeded to a stacked standing dc to replace the ch2 up to start Round 7.

We hope these tips help you!
Check back here next Tuesday 20 September for Part Two :)
No comments :
Post a Comment